

Build Your Own Gas Fire Pit: A Weekend Project That Saves Big Bucks
Gas fire pits are a fantastic way to transform your backyard into a hangout destination. Installing your custom DIY gas fire pit can be easier and more affordable than you think. EasyFirePits.com offers ready-made and custom gas kits directly to consumers, with same-day delivery and a lifetime guarantee on all our 316 stainless steel burners.
1. Plan Your Fire Feature Type: Choose between a fire pit, fire bowl, or fire table.
Fuel Source: Natural gas or liquid propane.
Location: A level, non-flammable surface, typically at least 10 feet from structures or overhangs but as there are no embers or floating smolders, there may be some leeway to this rule, but as always with any DIY project, use common sense.
2. Choose a Gas Kit and Burner
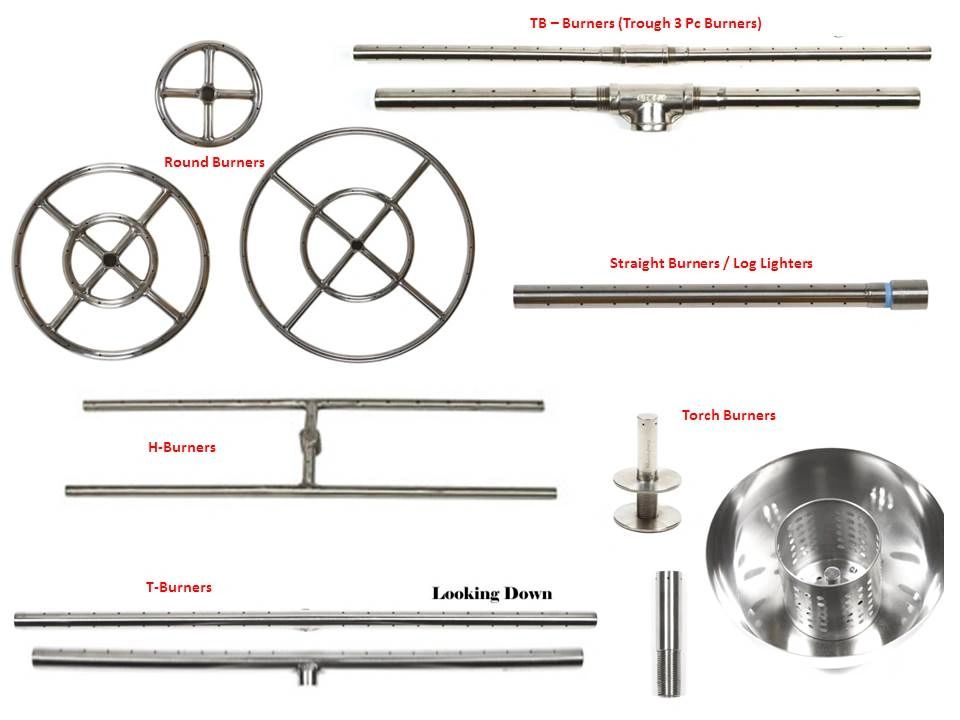
After you've decided which Gas Kit works best for your project and "fuel source," keep it simple or get as creative as you like. Use round burners for a more natural, campfire look, or opt for a linear burner to achieve a modern design. “T” burners, “H” burners, or straight one-piece burners work well for inlaid fire tables. Vertical burners and torches make great post-top or tabletop fire bowls. Consider combining fire features for a more customized outdoor experience. There are several hose lengths available for connecting your burner to your propane or natural gas source.
Click here to choose from a variety of lifetime-warranted marine-grade 316 stainless steel burners and kits. 316 stainless is significantly more durable than the commonly used 304 stainless steel, which can easily rot outdoors.
3. Build or Place Your Enclosure
Use concrete, brick, or metal materials to build your fire pit enclosure. Be sure to leave access for the gas connection and valves. For fire tables or other inlaid designs, choose a pan or insert that fits your fire feature.
4. Install the Burner
Place the burner in the center of the enclosure and connect it with the burner mounting kit, flare hose fitting adapter, and gas-rated flexible hose. Make sure there is no plumbing tape or sealant between the hoses and the flare hose fitting adapters, or there will be leaks.
5. Test for Leaks
Mix a soap and water solution and apply it to all gas connections. Then turn on the gas. Look for bubbles, which indicate a gas leak. If a leak is detected, tighten or redo the connection. Do not light your fire feature until all leaks are fixed. Regularly inspect your connections for leaks.
6. Add Flair
Place lava rocks or fire glass around the burner for aesthetic appeal. Be careful not to bury the burner too deeply beneath the rocks or glass. Only add about 1 layer over top of the burner, no more than 1-inch thick.
7. Light It Up!
Turn on your gas. If you have a key valve, turn it until you hear gas flowing. Use a stick lighter or click torch to ignite the burner, then turn the flame up to your desired ambiance. Enjoy your new fire feature responsibly! Supervise children and pets, and turn off your gas when you're done. Check out the videos below for ideas for your next gas fire pit or fire feature!

Want to talk your fire pit project out with a specialist? Contact us at EasyFirePits. Email info@easyfirepits.com or call the office line (813) 600-5592 today! Choosing this level means you're building something that feels professionally designed while maintaining the satisfaction of creating it yourself.